

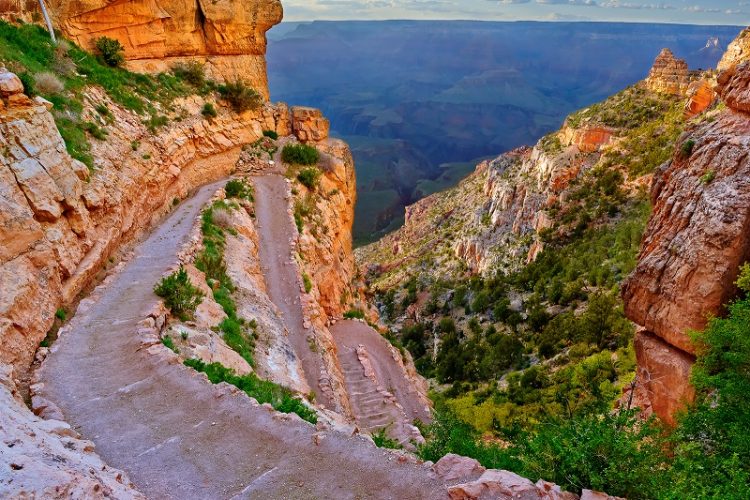
To start with, what is switchback in hiking?
A switchback is a trail that abruptly turns from one direction to the other as it climbs a steep hill or mountainside. This particular kind of trail enables your hiking effort to be eased through several lesser degree slopes rather than climbing straight up from the foot of a hill to the summit.
You’ve probably seen references to switchbacks while using one of the best navigation apps to find a new hiking trail. Usually, these references are made in the context of a steep or intimidating-sounding section, and you may be wondering what they exactly mean. Are switchbacks to be dreaded or eagerly anticipated? The purpose of switchbacks, why they’re preferable to hiking in a straight line, and why you should never cut a switchback are all explained here.
For more information, continue reading.
Table of Contents
Why Were Switchback Trails Constructed?
Like I said earlier, switchback trails make hiking more bearable by directing your ascent away from a steep mountain. Since the soil is loose, they are designed to keep hikers from falling off. It makes the climb easier due to the elevation grade reduction. Making it simpler for hikers to ascend a longer, less-steep route
They are also constructed to prevent the hill and trail from undergoing too much erosion. It helps maintain the trail’s gradient, which enables trail designers to set up erosion control by constructing rolling grade dips. This prevents water from running straight down the hill, which could harm the vegetation and some important trails.
Switchback Vs. Direct Hike
The difficulty in climbing a switchback is having to hike for longer stretches of time due to a longer trail. Strong endurance is what hikers need to complete the entire trail. Compared to a straight hike, this might be much less strenuous but also much more exhausting.
On the other hand, a direct hike takes much less time to climb but is more challenging and dangerous. A long, steady pace is preferred by some hikers, while others prefer this approach.
Are Switchbacks Hard?
As we just discussed, switchbacks are made to make climbing less strenuous, but that doesn’t automatically make them simple. They will be easier to climb than charging straight up the hill, and the same is true for the descent, but you are still hiking down a steep slope. Additionally, they extend your route, requiring longer periods of walking. Some hikes, like Colorado’s Notch Mountain, seem like they are unnecessarily long because they have so many switchbacks, whereas one of the toughest sections of the Appalachian Trail in There ought to be a few more switchbacks in New Hampshire.
Switchbacks Are You Able To Cut?
You’ve probably seen signs on the trail asking you not to skip switchbacks. Even if you think you’re fit enough to go straight up and save some time, you should always abide by this rule and practice good manners. The beauty of established hiking trails is that they limit the damage caused by your hiking boots to a smaller area than if every hiker just picked their own way up the hill. Switchbacks must be cut carefully to avoid trampling on vegetation and upsetting the delicate balance of the ecosystem below. This causes soil erosion as well over time.
These signs have frequently been erected in locations where active conservation efforts are being made to rebuild ecosystems. The trail might eventually be rerouted or even closed to restore an area if hikers frequently cut switchbacks. So please take the long, winding road if you want to continue enjoying the outdoors.
Advice On Preparing For A Switchback
You need to prepare physically if you want to hike for a long time or if it will be challenging, like trekking on switchbacks (especially if it’s your first time). Preparing physically for a hike has many advantages, such as preparing your lower body for steep, long slopes. You can withstand challenging level climbs more and more as you get used to it.
Utilizing the stairs daily to train my knees and legs is one action I’ve taken in the past that has greatly aided me. You can do it in two steps once you get used to doing it one step at a time.
Additionally, engaging in cardio exercise can improve your stamina and endurance for strenuous hikes like switchbacks. Squats are a good option because they focus on the leg muscles that we use most often when hiking. Consider exercising with downhill lunges as well. In descending steep slopes, this will be helpful.
Another beneficial exercise is using a stairmaster, which improves both climbing and cardiovascular endurance. Last but not least, remember to stretch to prevent injuries. In order for your body to be well-prepared for the hike, you could do this a month before it is scheduled.
Additionally, having the proper equipment on hand, such as hiking boots, a trekking pole, a mountaineering bag with a built-in water bladder, and cozy hiking attire, will be helpful. Buy a sturdy pair of shoes, especially. These will protect you from a lot of unplanned accidents. Planning is crucial, therefore. See more about What Is Interpretive Hiking?
Things To Pack For Hiking A Trail With Several Switchbacks
- Navigation tools such as a map and compass
- First-aid kit
- Knife or multitool
- Hydration bladder (2-3 liters of water bag)
Weather-appropriate Clothing
- Spring – lightweight shirt made of synthetic fabric, insulated water-resistant jacket or long sleeve, long pants
- Summer – convertible hiking pants, or shorts, shirt made of synthetic fabric
- Fall – same with spring clothes
- Winter – base layer cloth on the lower and upper body, an insulating layer which is thicker than the base layer, windproof jacket
- Hiking boots or hiking hybrid shoes
- Hiking socks (layered in colder weather)
Food Plan
- Breakfast – Dehydrated eggs, Granola, dry cereal, dried fruits
- Lunch – bagels, energy bars, nuts, jerky, dried fruit
- Dinner – instant rice, ramen noodles, instant soup, packaged meals
- Snacks – trail mix, nuts and seeds, pop-tarts
Shelter
- Sleeping bag and pad (for an overnight stay if there are no accommodation)
- Tent (for an overnight stay if there are no accommodation)
Optional Assistance
- Trekking pole
Overcome A Strenuous Hike With Switchbacks
Following your self-preparation, you should know how to navigate a switchback on the hike. Here are some recommendations for you.
- How to properly hydrate yourself and what snacks to bring.
The length of the hike and the terrain will determine how much water you’ll need to bring. This could add extra time to your hike, particularly if there are switchbacks. You will be walking more than 8 to 10 miles in the heat without a water station, for example, if you hike towards Havasupai Falls, which has switchback trails at the beginning.
Therefore, having a 2-liter or larger water bladder will do. Take frequent, small sips. To remind yourself to take a few sips, set a timer for every 15 to 20 minutes. Additionally, you should always pack extra food. Bring snacks that will help you stay hydrated, such as a ziplock of sliced apples, cucumber, and grapes.
Additionally, there are a few snacks you can eat to keep your energy up during the hike, including dried fruits, nuts, and protein bars.
- Research the terrain
There are currently no short cuts when hiking a switchback. Making the necessary preparations mentally and learning as much as you can about your destination will therefore be beneficial for you. Find out how many switchbacks you will encounter. How much time and distance will it require? Your preparation for the course, regardless of how many switchbacks there are, will be aided by your research. You will know what to pack and how to prepare your mind.
- Don’t cool down your body fully during breaks
You will need to continue moving even when taking breaks if you want to get over these switchbacks. Avoid cooling off because doing so could cause your heart rate to drop suddenly. Your heart is working very hard, and if you suddenly stop, you could become seriously ill. In order to avoid lower extremity blood pooling, which could result in fainting or dizziness, do as this is instructed.
Therefore, it is much better if you simply take a short stroll or stay standing until you feel your body settle down. This might help you complete the track just in time, especially if it’s a long trail like a switchback.
- Maximize the use of hiking poles
The use of hiking poles during a long climb increases your stability, even though some hikers prefer not to use these. This could ease any knee strain, help you maintain balance, and find your rhythm.
These trekking poles lessen the strain that hiking puts on our knee and leg muscles. By letting the weight rest on these poles, the upper body supports the lower body. When hiking for a longer period of time, you can adjust your comfort and stability by shortening the pole on the uphill section and lengthening it on the downhill side as necessary.
- Lastly, keep a positive attitude
If the trail consists of a chain of numerous switchbacks, a switchback trail may also be more difficult. Nobody promises that the ascent to the summit will be simple. Long hours of trekking will test your endurance and patience. The challenging and life-threatening edges will require your blood and sweat to overcome.
At times when you feel like giving up, it will even push you to go further. Overall though, always remember to maintain a positive outlook. An anonymous hiker once said, “the best view comes after the hardest climb.” If you have a positive outlook while hiking a mountain, you will continue until you reach the summit and can look back and say that it was all worthwhile.
Switchback Safety
Switchbacks are a crucial safety feature of mountainous trails, in addition to being easier and more convenient for a hiker. A switchback’s gradual incline can prevent you from suffering serious injuries if you’re hiking in an area with extremely steep and uneven terrain.
A path up a mountain without any switchbacks is a more difficult way to adjust to elevation. Elevation changes take place over shorter distances, which makes it easier for you to pace your ascent and become more acclimated to the altitude and pressure. Additionally, switchbacks help hikers avoid hazards on hills like loose rocks, drop-offs, waterways, and dense brush.
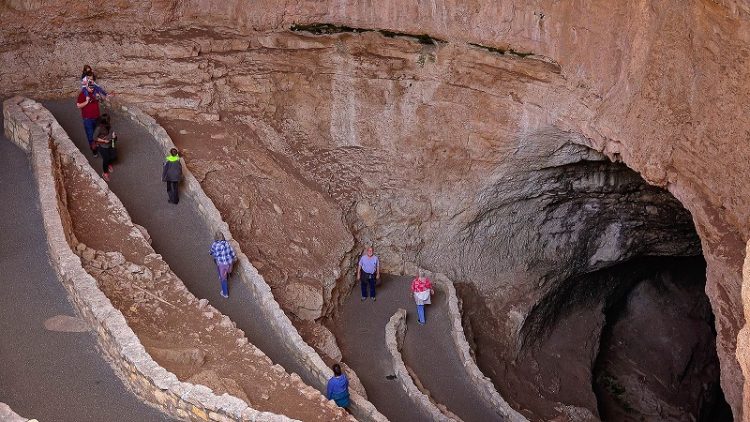
When hiking, it’s crucial to pay attention to more than just the presence or absence of switchbacks; you should also take note of the landing and the trail’s overall backslope. Even though the term “switchback” may seem straightforward, the engineering of such a trail may call for sufficient excavation and structuring the fill dirt to support a trail. Switchbacks aren’t just a trail winding up the side of a mountain; they are actually scooped out of the mountain and cut into it, which can make them much more stable than other types of trail.
Switchback Etiquette
You should, whenever possible, stick to established switchbacks. It is harmful to the soil and local vegetation to hike straight up instead of taking the zigzags of a switchback. Making a straight path increases the potential for erosion in addition to violating trail etiquette.
Water moves soil with it as it travels down a vertical path, causing ruts to form or deepen and even small mudslides. However, switchbacks are essentially horizontal. Due to the less obvious path of least resistance for gravity to pull the water along, it puddles and seeps into the ground as a result. In addition, because switchbacks are designed with drainage in mind, many of them were built intentionally. The switchback might have water bars, rocky drainage, or other quick-draining water removal that can handle both running and standing water. The uncut trail space in-between the switchbacks cannot be said to be the same.
In addition, switchbacks provide habitat for plants and animals. The vegetation in this area also prevents erosion, and many switchback trails are maintained with netting between the various levels. This makes it even more challenging to take or create a shortcut between the levels of the path and aids in preventing erosion of the trail and hillside.
You should also exercise caution when passing other groups on a switchback, depending on where you are. Communication with your friends and any other hikers you may come across on the trail is essential because switchbacks can be quite narrow. In general, the corners are frequently wide enough to allow other hikers to pass. The right of way should be given to hikers going up, as is the case in most hiking situations.
Navigating Switchbacks
Switchback trails can appear very misleading on a topographic map. It can be perplexing to look at the curves of a topographic map and see a hard line zigzagging across since they are by default a relatively straight trail. On your map, switchbacks will appear as large Zs across the topography. They are designed to reduce grades from high angles to an angle of 15-20º. These Z-shapes are frequently less dramatic when viewed in three dimensions, but they will be noticeable on a thorough topographic map.
You won’t need any special trail equipment because switchbacks are so precisely designed and built. Even your feet shouldn’t get too wet because they are made to reduce erosion and standing water. However, if you are a hiker or backpacker who uses poles, these can help you maneuver the ends of a switchback and help you make tight turns. For trail runners or other individuals who must quickly turn, this is especially helpful. Along with keeping you out of the bushes, poles can also help you determine where the switchback will turn next. They can help reduce the need for traction in the winter, or at the very least, make it more efficient.
You should still follow general hiking safety precautions when hiking a switchback trail. The safety of a trail is increased by switchbacks, but hiking is never without risk. Switchbacks at the steepest parts of a hike do not automatically change the required equipment or level of readiness.
Famous Switchback Trails
Looking for a switchback hike to start the season off that is both enjoyable and difficult? A tried-and-true favorite might be worth a try. With no special gear or overnight camping necessary, each offers beautiful scenery and numerous difficult direction changes. What’s more, they’re all located in the good ol’ U-S-of-A:
- Angel’s Landing (Zion National Park, Utah)
- Deer Mountain (Tongass National Forest, Alaska)
- Gregory Bald (Great Smoky Mountains National Park, Tennessee)
- Half Dome (Yosemite National Park, California)
- Mount LeConte (Great Smoky Mountains National Park, Tennessee)
- Mount Whitney (Sierra Nevada, California)
- Pololu Valley (Kohala Mountain, Hawai’i)
- Precipice Trail (Acadia National Park, Maine)
- Saddle Peak (Santa Monica Mountains, California)
- Wheeler Peak (Sangre de Cristo Mountains, New Mexico)
Faqs
Here are answers to some of the most frequently asked questions about switchbacks, their uses, and how to hike them successfully and safely.
What Are Switchbacks Used For?
Switchbacks lessen the grade, or incline, of the trail, which makes climbing steep terrain less taxing. You can take your time getting to the top and save enough energy to actually enjoy it once you get there because you aren’t being forced to charge straight up a hill or mountainside.
Switchbacks are also used by trail designers to maintain control over soil erosion on vulnerable slopes, protecting the sanctity of significant natural areas. To me, that is a win-win situation.
What Is A Switchback Cut?
“Cutting” a switchback refers to the practice of taking a shortcut up a lengthy switchback trail by walking directly up the slope. This is totally unacceptable, as I’ve already said.
Unless it is dangerous to do so, such as when a bear has been spotted or there is a rockslide, always stay on the trail. Even if there is evidence that someone else has done it, resist the urge to climb up the slope in the middle or on either side of a switchback. There is a reason why the trail exists. Use it.
What Do Mountain Bikers Refer To As A Switchback?
Another place where you might encounter switchbacks is on mountain biking trails.
With their tight hairpin turns that may or may not leave enough room for both wheels to travel in the same direction, they resemble the switchbacks you’d find on a typical hiking trail. Switchbacks on mountain bikes require riders to master specific maneuvers.
Conclusion
A switchback is a kind of trail or path that ascends steep terrain, like a mountainside or hillside, in a zigzag pattern. They are one of the safest methods of navigating steep terrain, so they are frequently found in mountain passes.
Switchbacks function by substituting several paths with a lower grade for one path with a steeper grade. Switchbacks are a type of ascent that wind from one side of a slope’s face to the other, then back again. Since the switchback path has a gentler slope and doesn’t require as much energy as a steep climb, the lengthened path may not actually require much more effort to climb.
Regarding your reading, I thank you.